Skillet Pastitsio

You read that right – Skillet Pastitsio! Let us assure you, while we all love and respect the traditional Greek staple that is “Pastitsio”, we don’t always have the time needed to make it. While we know we can’t top “giagia’s” (grandma’s) classic we try to capture its comfort. Those beautiful layers of bechamel, spiced meat sauce and thick pasta noodles with a creamy cheese topping are the warmest hug during the Fall and Winter seasons. We wanted to reimagine this dish so that it can be enjoyed in a fraction of the time but still retaining that quintessential flavour we all know and love.


Follow along for the new Pastitsio recipe we know you will be saving!

First, you will need a 3-quart ovenproof skillet with a lid. Get the olive oil into the skillet on a medium-high heat, add the ground beef and season with salt and pepper.  Brown the ground beef for 6-8 minutes or until no longer pink and starting to brown. Add the diced onion, minced garlic, ground cinnamon, ground clove and cook together for another 5-7 minutes or until the onions have softened. Add in the tomato paste and cook for another 2-3 minutes making sure to stir it in well so it doesn’t settle in one spot. Add the chicken stook and bring to a boil.

Add the Ditalini pasta, stir to combine and turn the heat down to a gentle simmer. Cover with a lid and allow to cook until the pasta is cooked ‘al dente’, approximately 12-15 minutes, giving it a stir every 2-3 minutes or so to avoid sticking.

While the pasta is cooking, preheat the broiler to high and prepare the bechamel sauce. The base to any good bechamel sauce is a roux, butter and flour cooked together to create the ultimate thickener. Ensure you have your warm milk ready to go. Place a medium saucepan on medium heat and melt the butter. Add in the flour and cook together forming the roux by stirring constantly until a smooth paste forms. Slowly begin adding the warm milk in a few splashes at a time and stir between each addition until smooth to avoid clumping. Once all the milk has been added in, add in half of the grated Kefalotiri, and stir to combine. Remove from the heat, add salt, pepper, and stir in the egg yolk, which creates the creamiest consistency.

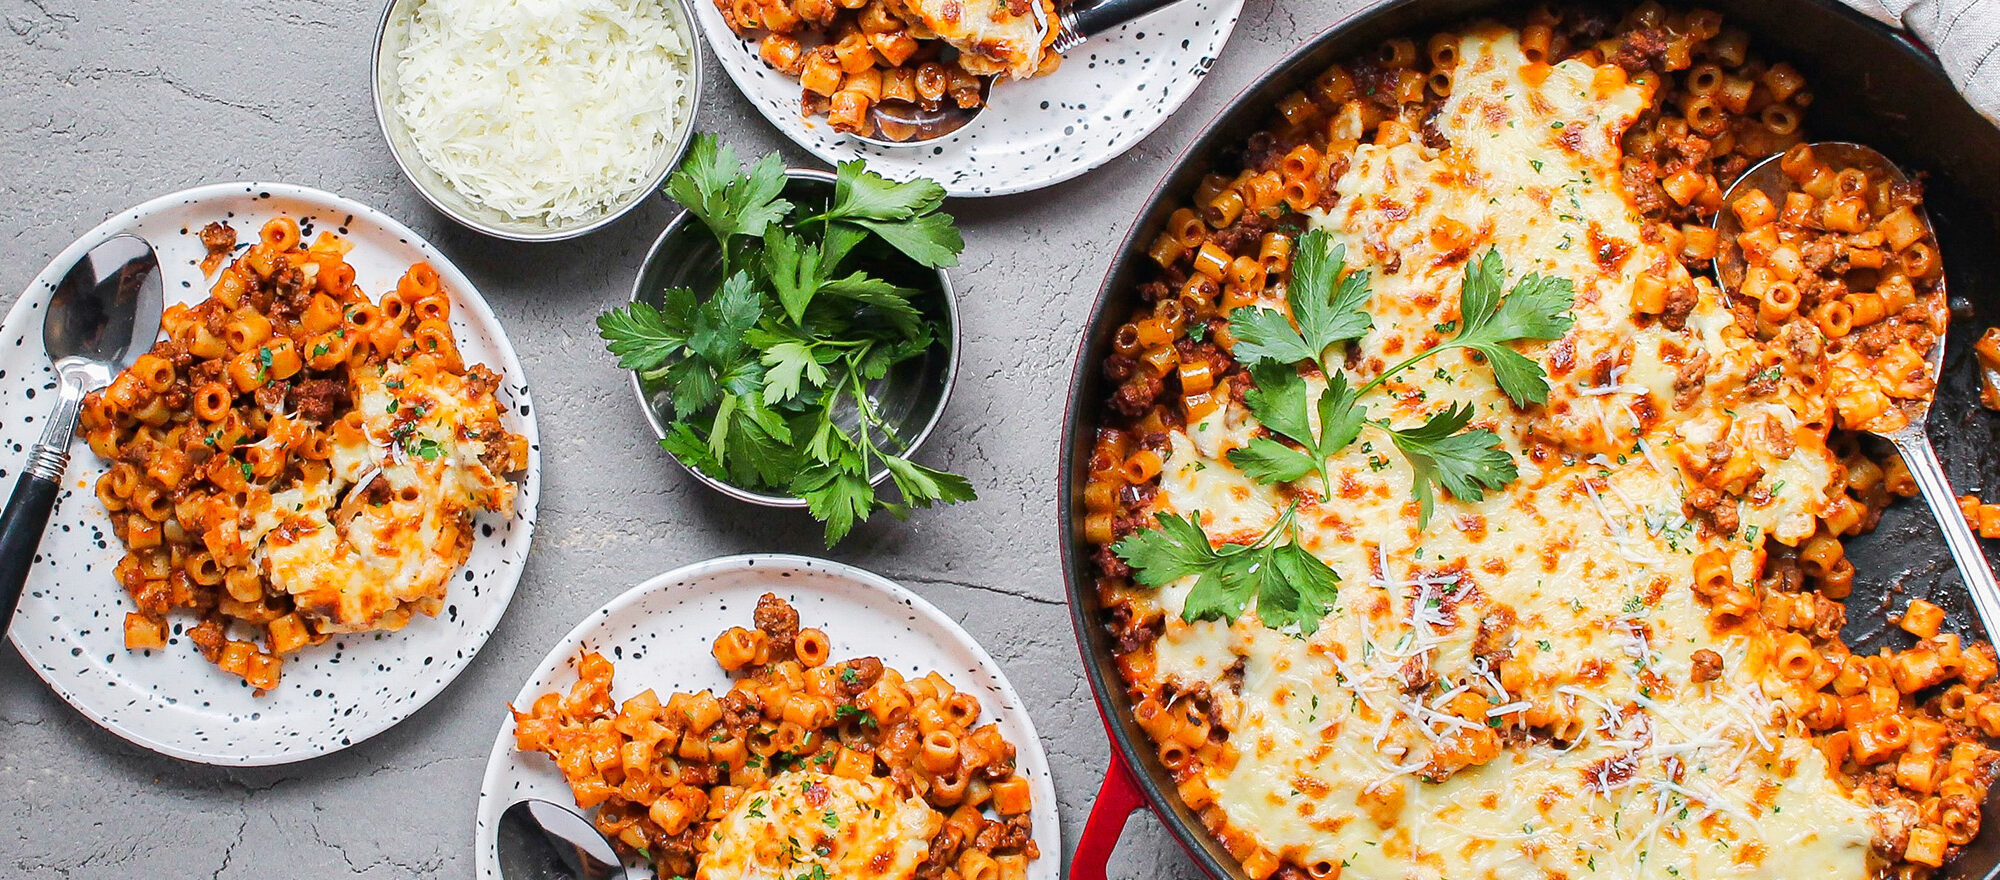
Seasoning each layer is key to marrying everything together! Once your pasta is cooked through season with salt, pepper, and half of the chopped parsley. Evenly pour or ladle the bechamel over top of the pasta and meat mixture and evenly sprinkle the remaining Kefalotiri over top. Place under the broiler for 2-3 minutes watching closely until the cheese forms a golden brown and bubbly layer on top.

Sprinkle remaining parsley and serve.

A nod to the classic Pastitsio ready in a fraction of the time but prepared with the same amount love.

Click here to discover the recipe.

Greek Chicken Harvest Bowls

Our Greek Chicken Harvest Bowls are satisfyingly savoury, easy to prepare, that every member of the family will enjoy! A quick and healthy one pan dinner for those late weeknights, for meal prep or a breeze to whip up on those busy weekends. The mix of Krinos souvlaki seasoning, Kalamata olives, and feta pack a punch that gives everyday chicken dinners a much-needed makeover. To take it to the next level, we add our new creamy Greek Yogurt Tzatziki Dip right on top to finish these bowls with extra flavour.

Follow along below and maybe this could be dinner tonight!

First you will need to preheat your oven to 375 F. Add your broccoli florets and diced sweet potato into a bowl with olive oil, salt, and pepper. Mix to ensure an even coating of oil and spices then transfer to a 12×18 toasting pan lined with parchment paper making sure they are in an even single layer. Don’t skip this step, it ensures even cooking. Set the mixing bowl and what is already in it aside and add in the remaining olive oil and Krinos souvlaki seasoning. Massage this all into the chicken so all pieces are evenly coated and have the flavour locked in. Add the chicken to the other half of the roasting pan.

Place the roasting pan into the oven and roast for 15-20 minutes until cooked through. Be sure to flip everything halfway through. You will see slight browning around the edges when everything is nice and roasted. (Note that chicken needs to be cooked safely to an internal temperature of 165 F or higher). Once they are removed from the oven, allow to rest and then slice or dice to your preference.

While the chicken and vegetables are roasting, get started on the Israeli Couscous which is the delicious, base for your bowls. Israeli Couscous differs from traditional Couscous in that it is much larger and heartier, it is also called ‘pearl’ couscous because of its size and shape. Get your salted water or chicken broth to a boil in a medium sized pot and cook the Israeli Couscous according to the package directions. Drain and toss in a splash of Krinos Extra Virgin Olive Oil, parsley, and lemon juice until combined.

Have your roasted chicken pieces, vegetables, dressed couscous and all the amazing toppings set up like an assembly line for ease in creating these beautiful bowls.  Evenly divide the couscous between the bowls, top with the roasted vegetables and chicken, then add the crumbled feta, pitted olives and a healthy helping of our new Tzatziki Dip. Want a spicier kick? Use our Jalapeno Tzatziki Dip!

A one pan dinner that translates into a creative and exciting new way to enjoy the humble chicken breast. A fun family tip to get the kids involved – set up their bowls with the couscous base and allow them to add their own toppings!

Click here to discover the recipe.

Cilantro & Feta Grilled Corn Ribs

Corn on the cob is a summer staple and we have an upgrade to this classic that you won’t want to miss out on! We have the ultimate corn side dish or vegetarian main – Corn Ribs! The way the corn is cut off the cob makes for this unique shape that is easy to prepare and even easier to eat. A good slather of our loaded butter and a bright topping of feta are the perfect partners to this crunchy, craveable corn!

Ready in under 30 minutes here’s how it’s done:

Preheat your BBQ to 350o F (note this can also be done on an indoor grill or Air Fryer).  Ensure your ears of corn have the husks and as many of the silks removed as possible.

Trim the top and bottom of each ear of corn so they are flat on both ends. Then cut each ear of corn in half in the middle. Take each half, stand up on the widest part for more control, and cut in half vertically. This is the part where we now get our corn “ribs”, when you then take each halves that you have just cut and cut them into quarters.

Give each corn rib a light brush with vegetable oil and place on the hot grill and allow to cook for 3-5 minutes or until slightly charred.   (This is where you can add into your Air Fryer and cook according to the instructions for your specific appliance). Get your melted butter ready because this is the best part!

Once the corn is charred to your liking, remove from the grill onto your serving platter and slather with the melted butter and a sprinkle chili powder or flakes. Top with a generous helping of crumbled feta and the chopped cilantro. For another layer of flavour, place tangy lime wedges around the platter to be squeezed upon serving. You have now mastered the corn rib – a dish your guests will be asking you to make again and again!

Click here to discover the recipe.

Summer Tomato Salad with Grilled Peaches and Feta

That’s right, we said ‘grilled’ peaches, but don’t worry it’s easier than you think. Sweet Ontario peaches are now in season! We’re going to combine this tasty fruit with our Krinos feta to add some excitement to a simple heirloom Tomato Salad. This recipe plays on the perfect combination and contrast of the sweet peaches and salty feta, while highlighting these juicy and fresh heirloom tomatoes. This will sure be a treat, are you ready? Let’s get started!

Preheat a well-oiled barbeque to 350˚F to grill the peaches to perfection. As the grill is heating up, cut up your peaches in quarters and toss them in just enough oil that lightly coats them. Once the grill has reached its required temperature, place them cut side down on the barbeque. To achieve those nice grill marks, cook the peaches no longer than 2-4 minutes. Flip pieces to the other side and proceed to cook for an additional 2-4 minutes. Once completed, set aside your peaches, and begin to prepare your salad.

Cut your heirloom tomatoes into wedges or rounds approximately 1cm thick and cut the heirloom grape tomatoes in halves. These tomatoes are perfectly ripped and full of flavour as they thrive in the month of July! As they add an earthy, almost smoky sweetness to them that really complements this salad. Grab your favourite Krinos feta and crumble them into bite-sized or block sized pieces, we won’t tell!

As we begin to assemble the salad, layer the fresh sliced heirloom tomatoes onto a serving platter, then followed by the halved heirloom grape tomatoes. To enhance these flavours, use a pinch of flaky sea salt and cracked black pepper to season your tomatoes to the desired taste.

Once completed, nestle the grilled peaches in and around the seasoned tomatoes. Generously sprinkle Krinos Greek feta evenly across the dish, its rich buttery bite taste will dance with the sweetness of the peaches on your palate! As a finisher, top your dish with a drizzle of Krinos Extra Virgin Olive Oil followed by Krinos sweet Balsamic Glaze, then sprinkle in some fresh or flake basil leaves and your meal is ready to be served!

This dish is easy to whip up on those busy weeknights or will leave your guests wanting more! This Tomato salad with grilled peaches and feta will always be a classic summer staple, enjoy it while you can!

Check out the recipe here

Hot Honey-Garlic Air Fryer Wings

Create an amazing menu for dad this Father’s Day centered around our new recipe Air Fryer Hot-Honey Garlic Wings. Hot-honey has been one of the fastest growing food trends and it is here to stay! The simple combination of spicy hot sauce with sweet, sticky honey makes for the perfect condiment, especially with chicken wings. Check out how we make ours featuring Attiki pure, raw Greek honey for the ultimate Father’s Day feast.


Using the air fryer is not only the healthier option but cooking is a breeze and cleanup is quick and easy! To prepare the chicken to have the perfectly crisp skin, pat the wings with paper towel to absorb any excess moisture and have them as dry as possible. Toss them in the spice mix to and ensure it really adheres to the outside.


Next, place them into your air fryer preheated to 425˚F in a single layer making sure there is space around each wing to ensure even cooking all the way around. Depending on the size of your fryer you may need to cook multiple batches. Cook 10 minutes on one side and another 10 on the other until you see that golden brown skin and are cooked through.


While the wings are getting crispy and delicious you can use that time to prepare the ultimate condiment! The hot-honey garlic sauce can be used on a variety of proteins, not just wings – try it with tofu for a vegetarian version. In a small pot, first melt some butter and then add in minced garlic, thyme, Attiki honey and Sriracha – give it a stir to combine. The ratio of hot sauce to honey here is 3 tbsp of hot sauce to 2 tbsp honey – this can be adjusted to suit your preferred heat level and any hot sauce can be used!


Once the wings are done cooking, you can toss them in the sauce for that good-type-of-messy or on the side for those who like to control their spice level. Either way these will be gone in seconds – get your napkins ready!

Check out the recipe here