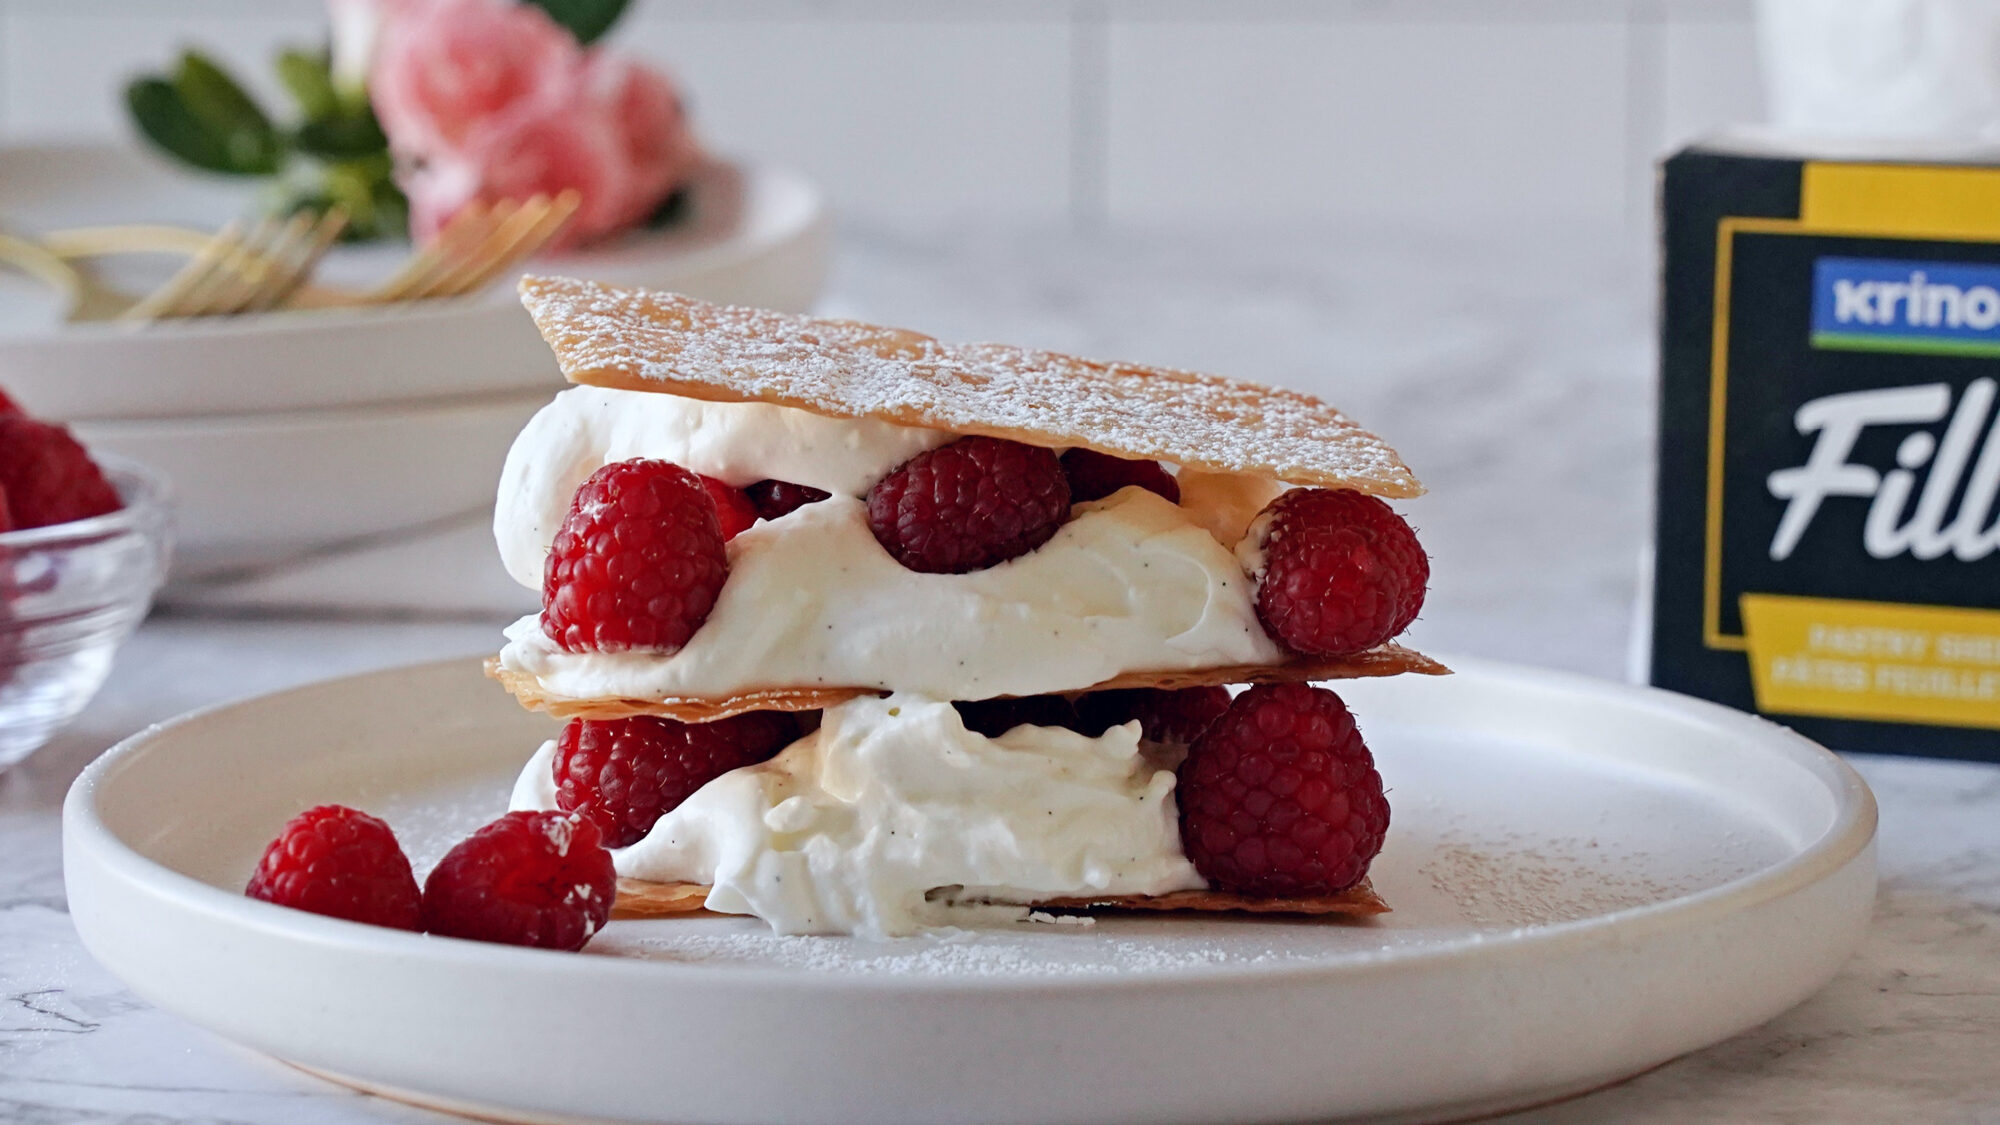
Spice Roasted Cauliflower and Carrots with Tahini Dressing

We all like to overindulge during the Holiday Season but come the new year we are all looking for healthier meal options. We know “salad” is always the first thing that comes to mind, but why not level-up your veggie game with our Spice Roasted Cauliflower and Carrots topped with Tahini Dressing! Follow along below for what will be your favourite new year vegetarian dish.

First, preheat the oven to 375°F. Cut a head of cauliflower (about 700 grams), into florets and set aside. Prep your whole baby carrots (about 250 grams), by trimming tops and peeling. You can also use prepared baby carrots or larger carrots cut into smaller spears. In a large mixing bowl combine extra virgin olive oil, with ½ teaspoon each of: garlic powder, paprika, cumin and chili flakes and mix to combine. Add salt and pepper to taste. Then add the prepared cauliflower and carrots and toss to coat evenly. Spread the veggies onto a baking sheet and loosely cover with foil to create a warm, steamy atmosphere for the veggies to cook through and bake for 15 minutes.

After 15 minutes, remove the foil and bake uncovered for another 15 minutes, or until the veggies begin to turn that roasty golden brown that really transforms them into something amazing! While the veggies are roasting, prepare the creamy, nutty, tahini dressing. In a small bowl, combine 2 tablespoons of Krinos extra virgin olive oil with 1 tablespoon of Krinos tahini, 1 teaspoon of honey, the zest of 1 lemon, 2 tablespoons of lemon juice and 1 teaspoon of finely minced or grated garlic. Season with salt and pepper and whisk until smooth and creamy. Feel free to add 1-2 tablespoons of water as needed to thin out to the desired consistency – you should be able to drizzle over the veggies.

Once the spiced cauliflower and carrots are done baking, transfer to a serving platter while still warm, and top with the tahini dressing and some fresh chopped parsley. Serve and enjoy!

Our Spice Roasted Cauliflower and Carrots with Tahini Dressing is a warm yet bright, and beautiful vegetarian dish and a breeze to bring together. Don’t forget to tag us on Instagram or Facebook when you make this dish to be featured @krinoscanada!


Click here to discover the recipe.

Sesame-Oregano Fillo Crisps with Spanakopita Dip

That festive time of the year is upon us – a time for friends, family, and FOOD! We gave the classic “chips and dip” a festive and fancy twist with these Sesame-Oregano Fillo Crisps and Spanakopita Dip that will be a hit at every party. The perfect bite is created with crisp, golden layers of flaky fillo, topped with toasted sesame and fragrant oregano and paired with our warm, creamy, spanakopita dip. It couldn’t be easier to create this mouth-watering appetizer, just follow below and look out for notes on how to make ahead of time!

As with most fillo-centered recipes, time is of the essence to keep your fillo from drying out. Start by preheating the oven to 350°F and have a small pot of melted butter with a brush ready. Place a piece of parchment paper, about the size of your baking sheet, on your work surface ready for the fillo. In a small bowl, combine 1 tablespoon each of toasted sesame seeds and dried oregano with ½ teaspoon of salt, set aside. Beat 1 egg white in a small bowl and set aside.

Now that the butter and toppings are ready, unroll the thawed fillo and place 1 sheet on the parchment-prepared work surface. Generously brush fillo with melted butter. Add another layer of phyllo, gently smoothing out any air pockets and brush again with melted butter. Repeat process three more times, but do not use butter on the top sheet. On the top sheet brush on the beaten egg white to ensure the toppings adhere well to the fillo. Sprinkle phyllo evenly with sesame-oregano mixture.

Using a pizza cutter or sharp, non-serrated knife, cut the fillo into 48 pieces (8×6 rectangles). Very carefully bring your sheet pan over and slide the parchment paper with the fillo onto the sheet pan. Bake 10-12 minutes until crisp and golden brown. Make-ahead tip: Let crisps cool completely, avoid urge to sneak some, and store in an airtight container for up to three days.

While these crips are delicious on their own, our creamy, cheesy warm spanakopita dip takes them another level up! Preheat your oven to 375°F. Shred 4 ounces of mozzarella and in a separate bowl, crumble 6 ounces of Krinos feta cheese and set aside. Ensure frozen spinach is thawed and all liquid is drained. A kitchen towel or cheesecloth is ideal to place thawed spinach in and wring out all excess liquid into the sink or over a colander, set aside. Next, chop 1 medium yellow onion and mince 3 cloves of garlic. Now you are ready to get it all together!

Using a sauté pan on medium heat, add 2 tablespoons of extra virgin olive oil, then the onion and garlic. Cook until softened and onions are light golden brown. Add in the spinach and season with salt and pepper, mix well to combine and remove from heat. In a mixing bowl, add the spinach mixture, half of the mozzarella, the feta and 7 ounces of ricotta cheese. Stir to combine and transfer to an ovenproof dish. Top with the remaining mozzarella and bake for 12-14 minutes or until bubbly and golden brown. Allow to cool slightly and serve with crisps while still warm! Make-ahead tip: Stop after adding the mozzarella to the top, cover tightly with cling wrap and refrigerate up to 24 hours, then bake as noted above.

Who says you can’t give the gift of delicious food for the holidays? Your guests will be delighted to dig into the amazing dish prepared for them with layers of love – and crispy, cheesy, buttery goodness!  Tag us when you recreate this for your chance to be featured @krinoscanada.

Click here for the full recipe.

Squash and Feta Fillo Pie

Comforting, crunchy, buttery and salty are perfect words to describe our latest recipe! Warm up this November with our Squash and Feta Fillo Pie, featuring silky smooth butternut squash, flaky golden fillo and our premium feta cheese. Follow along for this family favourite in the making.

First off, start with thawed Krinos fillo sheets and also have a small saucepan with about 4 tbsp. of melted butter and a brush ready to go. Preheat your oven to 400°F. Gently unroll the fillo sheets onto a clean work surface and place a damp towel on top to prevent the fillo from drying out. It should be noted that fillo tends to dry out quickly so be prepared with all ingredients ready to go before you open the package to avoid this happening.

Line a 9-inch deep-dish pie plate, ceramic flan dish or similar vessel with 2 sheets of fillo stacked on top of each other. Brush with melted butter and repeat the process twice more, offsetting the fillo by a third each time and trim any overhang. You should have coverage of the bottom and sides of the dish. This should look comforting and rustic, so don’t worry about being perfect here!

On a clean work surface, arrange one remaining fillo sheet with the longest edge closest to you and pleat it accordion-style at about 1inch intervals. Repeat this with the last 2 sheets. Go back to your prepared dish and starting in the centre of it, coil one of the pleated strips from the middle of the dish outward, leaving about a half inch of space between the coiled rows. Take the next strip and start from the end of the first and continue moving outward. Repeat by taking the next strip and starting at the end of the last and you should see the coils cover the bottom of the dish by the end. Brush with remaining butter to get good coverage on the fillo and bake for 15-18 minutes or until golden and crisp. Set aside once cooked and keep your oven on. Now onto the fillings.

Coarsely grated squash is used for the filling, you can use a food processor, chopper, or box grater to achieve this, it will make it easier for the squash to become soft and luscious! In a medium skillet, combine the 1 ½ cups of grated butternut squash with ½ cup water and 1 tbsp of butter. Season with salt and pepper to taste (cayenne pepper if you like it spicy!) and simmer on low heat covered for 8-10 minutes until soft and set aside to cool.

Now onto the part that makes this super creamy and comforting! In a separate bowl, whisk together 5 eggs, 1 cup of half & half cream, ¼ tsp of ground nutmeg and 1 tbsp of chopped fresh or dried thyme, also season this mixture with salt and pepper to taste. With multiple fillings and layers it is important to season each step of the way to ensure maximum flavour throughout!

To assemble the finished pie, dollop the squash mixture between the fillo coils with a good coverage so you get squash in every bite! Then pour the egg mixture around to fill. Scatter with as much crumbled feta as you like – we like a lot! – and bake for 25 minutes or until set. When set, the egg mixture should no longer be liquid. Once baked through, let cool slightly to help filling set even further. Slice and enjoy!

This amazing Squash & Feta fillo Pie is a seasonal wonder, a comforting meal for a quick dinner but also exciting enough for entertaining. Definitely a must-try!

Click here to discover the recipe.

Skillet Pastitsio

You read that right – Skillet Pastitsio! Let us assure you, while we all love and respect the traditional Greek staple that is “Pastitsio”, we don’t always have the time needed to make it. While we know we can’t top “giagia’s” (grandma’s) classic we try to capture its comfort. Those beautiful layers of bechamel, spiced meat sauce and thick pasta noodles with a creamy cheese topping are the warmest hug during the Fall and Winter seasons. We wanted to reimagine this dish so that it can be enjoyed in a fraction of the time but still retaining that quintessential flavour we all know and love.


Follow along for the new Pastitsio recipe we know you will be saving!

First, you will need a 3-quart ovenproof skillet with a lid. Get the olive oil into the skillet on a medium-high heat, add the ground beef and season with salt and pepper.  Brown the ground beef for 6-8 minutes or until no longer pink and starting to brown. Add the diced onion, minced garlic, ground cinnamon, ground clove and cook together for another 5-7 minutes or until the onions have softened. Add in the tomato paste and cook for another 2-3 minutes making sure to stir it in well so it doesn’t settle in one spot. Add the chicken stook and bring to a boil.

Add the Ditalini pasta, stir to combine and turn the heat down to a gentle simmer. Cover with a lid and allow to cook until the pasta is cooked ‘al dente’, approximately 12-15 minutes, giving it a stir every 2-3 minutes or so to avoid sticking.

While the pasta is cooking, preheat the broiler to high and prepare the bechamel sauce. The base to any good bechamel sauce is a roux, butter and flour cooked together to create the ultimate thickener. Ensure you have your warm milk ready to go. Place a medium saucepan on medium heat and melt the butter. Add in the flour and cook together forming the roux by stirring constantly until a smooth paste forms. Slowly begin adding the warm milk in a few splashes at a time and stir between each addition until smooth to avoid clumping. Once all the milk has been added in, add in half of the grated Kefalotiri, and stir to combine. Remove from the heat, add salt, pepper, and stir in the egg yolk, which creates the creamiest consistency.

Seasoning each layer is key to marrying everything together! Once your pasta is cooked through season with salt, pepper, and half of the chopped parsley. Evenly pour or ladle the bechamel over top of the pasta and meat mixture and evenly sprinkle the remaining Kefalotiri over top. Place under the broiler for 2-3 minutes watching closely until the cheese forms a golden brown and bubbly layer on top.

Sprinkle remaining parsley and serve.

A nod to the classic Pastitsio ready in a fraction of the time but prepared with the same amount love.

Click here to discover the recipe.

Greek Chicken Harvest Bowls

Our Greek Chicken Harvest Bowls are satisfyingly savoury, easy to prepare, that every member of the family will enjoy! A quick and healthy one pan dinner for those late weeknights, for meal prep or a breeze to whip up on those busy weekends. The mix of Krinos souvlaki seasoning, Kalamata olives, and feta pack a punch that gives everyday chicken dinners a much-needed makeover. To take it to the next level, we add our new creamy Greek Yogurt Tzatziki Dip right on top to finish these bowls with extra flavour.

Follow along below and maybe this could be dinner tonight!

First you will need to preheat your oven to 375 F. Add your broccoli florets and diced sweet potato into a bowl with olive oil, salt, and pepper. Mix to ensure an even coating of oil and spices then transfer to a 12×18 toasting pan lined with parchment paper making sure they are in an even single layer. Don’t skip this step, it ensures even cooking. Set the mixing bowl and what is already in it aside and add in the remaining olive oil and Krinos souvlaki seasoning. Massage this all into the chicken so all pieces are evenly coated and have the flavour locked in. Add the chicken to the other half of the roasting pan.

Place the roasting pan into the oven and roast for 15-20 minutes until cooked through. Be sure to flip everything halfway through. You will see slight browning around the edges when everything is nice and roasted. (Note that chicken needs to be cooked safely to an internal temperature of 165 F or higher). Once they are removed from the oven, allow to rest and then slice or dice to your preference.

While the chicken and vegetables are roasting, get started on the Israeli Couscous which is the delicious, base for your bowls. Israeli Couscous differs from traditional Couscous in that it is much larger and heartier, it is also called ‘pearl’ couscous because of its size and shape. Get your salted water or chicken broth to a boil in a medium sized pot and cook the Israeli Couscous according to the package directions. Drain and toss in a splash of Krinos Extra Virgin Olive Oil, parsley, and lemon juice until combined.

Have your roasted chicken pieces, vegetables, dressed couscous and all the amazing toppings set up like an assembly line for ease in creating these beautiful bowls.  Evenly divide the couscous between the bowls, top with the roasted vegetables and chicken, then add the crumbled feta, pitted olives and a healthy helping of our new Tzatziki Dip. Want a spicier kick? Use our Jalapeno Tzatziki Dip!

A one pan dinner that translates into a creative and exciting new way to enjoy the humble chicken breast. A fun family tip to get the kids involved – set up their bowls with the couscous base and allow them to add their own toppings!

Click here to discover the recipe.